
 By Jim Boyd
While we seldom consciously think about it, one of the skills that we acquire as railfan photographers is the ability to “pre-envision” a picture. When a locomotive, train or scene is standing still, we can approach it, study it and photograph it at our leisure, noticing the lighting, composition and relationship of details. There is no imagination or pre-envisioning required. It’s right there in front of you. When a train is moving, however, you invariably have to plan a photograph around a subject that has not yet arrived on the scene. You have to preenvision how the scene will look with the subject in it. Therein lies the skill.
In judging the Cover One Contest this year, our First and Second Place winners were determined to a large degree by the need for the photographer to pre-envision the scene. When we were down to the final dozen or so finalists, we decided to go for the two top winners, and for the sheer quality of their images and degree of impact, Scott Snell’s Oakway and Alan Tillotson’s Metro-North FL9 were standouts. Both would make excellent covers. The FL9 would have made the more unusual cover with its high angle and impressive size, but the impact of Snell’s Oakway with the “layered” lighting and stark shapes could not be denied. In the close competition, Snell’s skill at pre-envisioning the photo swayed the decision. It was the far more difficult photograph, and he executed it to perfection.
When Scott arrived at the scene on Montana Rail Link, the sun was dropping low in the evening sky, and the position of the semaphore blade was the only hint of the photograph that was about to unfold. He studied the scene, shifted his position to align the anticipated locomotive against the shadow on the distant hillside and set his exposure for the nose that he knew would be in full sunlight (a light meter reading off the dark hillside would have grossly overexposed the white and blue SD60 when it showed up). Being an experienced photographer, Scott probably did all of this almost without thinking about it. Even without the train there, he knew what the final picture would look like. The strain of anticipation must have been intense, as he sweated out the arrival of the train before the light could change. When it did show up, he nailed the shutter at the perfect instant. Not a matter of luck, but the result of pre-planning and “spotting” where he wanted the locomotive in the final picture. It was that combination of skills that was rewarded with First Place.
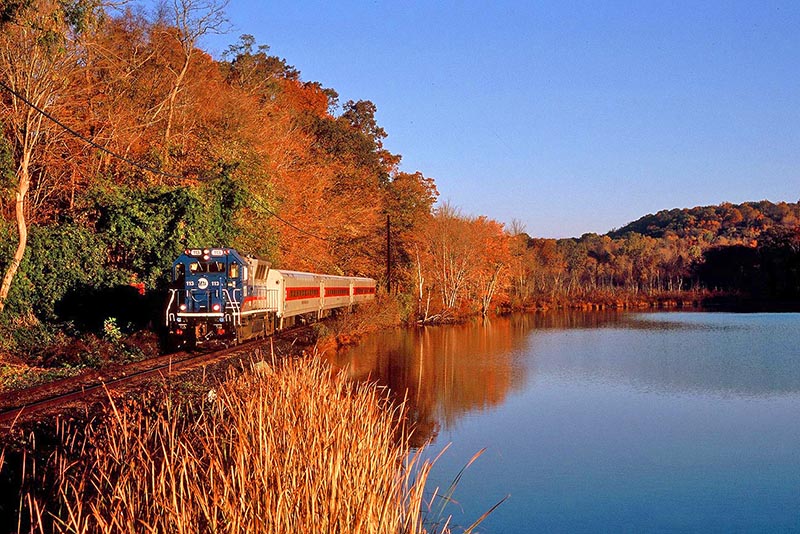
Though it in no way reflects poorly on the photographer — Tillotson is also an excellent action photographer — the FL9 at Harmon was a static scene that could be studied, composed and “tweaked” in the viewfinder as it sat there. In this instance, all the photographer had to do was recognize the elements and lighting and drive the camera accordingly.
Cover One Contests aside, the simplest railfan action photography involves a degree of pre-envisioning. The typical backside “wedge” shot of a moving train is usually composed before the train is in the scene. While an inexperienced photographer will probably think simply, “this is a nice spot,” the veteran will be consciously or unconsciously scanning the elements of the photo: Where is the light coming from? How will the train look against the background? Precisely where do I want the front of the locomotive?
Pre-envisioning will usually result in a better photo than a mindless “point and shoot” approach. As I frame up a scene, I first look at the light. Generally, although not always, I will want direct sunlight on the subject. I look for shadows across the track that will translate into shadows across the locomotive and shift the camera position accordingly. I then pick a “spot” where I want to freeze the locomotive and mentally note it with a landmark like a rail joint, small bush or other backside detail. I will then frame the picture and let the train run into it, snapping the shutter when the train reaches my predetermined spot.
Picking that spot also involves a study of the background. Do I want the train projected cleanly against the sky or laid against the trees, a hill or buildings? In the East it’s usually trees, and I’ll try to pick out an attractive “skyline” pattern or a distinctive individual tree to use for a frame at the edge of the photo. I’ll also look for bothersome details that will protrude above the train or compete with the front for attention. If the train is light colored, I can work with a dark background, like summer foliage. If it is dark — or a steam engine — I will usually prefer a light background or the sky. The angle and contrast of the light is important here. Snell’s Cover One shot is a classic study of lights-against-darks in selecting a background.
Pre-framing a run-by photo is my favorite approach. I will study the scene, pre-envision the train in it and then align the camera accordingly. One of the advantages of this over the “follow in the viewfinder” approach is that by pre-framing you can study all of the related elements beforehand and decide where to place the train. When you follow in the viewfinder, you often encounter elements in the photo that come unexpectedly into view, and by the time you recognize them, it’s usually too late to incorporate them into or eliminate them from the picture.
Also, when following in the viewfinder, it is natural to put the front of the locomotive in the middle of the viewfinder screen. This will often result in a typical “snapshot’) look to the photo. A better composed photo will probably have the subject high or low or off to one side of the frame to better utilize the other elements in the picture. I noticed this in my recent photos of the run-bys at the last Steamtown Photographers’ Weekend, as my first shot on each run-by was carefully composed with the trees framing the locomotive, the train nicely visible and the camera pointed slightly high to allow for the beautiful smoke plume. After snapping this “prime” shot, I would rapidly advance the film and zap a “grab” shot of the passing locomotive. In that second grab shot, all my careful composition was nowhere to be seen. The smokebox was in the geometric center of the frame, the smoke was cropped and the ballast filled the foreground and useless trees ahead of the locomotive were balanced by not enough train behind it. That second shot was invariably a “throw-away.” A motor drive, which I do not use, would have probably eliminated the problem, as I could then concentrate on maintaining the image in the viewfinder rather than taking it down to advance the film by hand and hurriedly reframing the quickly changing scene.
And there is, incidentally, quite a difference between photographing steam and diesel subjects. With diesels you don’t usually have to consider a plume of smoke or other steamy variables. When framing for a steam locomotive, however, smoke and steam should be anticipated, and you will need to know whether to expect a clean stack or a billowing plume. And while wind direction is seldom a problem with diesels, it can make or break a steam shot. I recall a steam era veteran commenting on Mike Del Vecchio’s shot of UP’s 3985 storming up Archer Hill last year that he was lucky to have had a southwest wind. “The usual northwest wind there would generally blow the smoke down to the sunlit side and obscure the train.” And that smoke plume also casts a shadow, which on back-lighted subjects just might shadow the locomotive!
Buildings in a scene require careful thought. The classic dilemma is a depot on the far side of the tracks and a typical approaching train. Do you snap the train a bit too far away before it covers up the depot or do you get the “proper” angle on the train and let it obscure part of the building? With a set of signals, do you snap the photo before the engine “splits” the signals, as it is framed between them or after it passes and pokes out beyond them? In different circumstances, any or all of those options could make a good picture.
The key to action photography is the ability to look at a scene without the train in it and imagine what it will look like when the train gets there. A little planning, discipline and evaluation of the results will sharpen your skills as a photographer.
Incidentally, the most extreme example of pre-envisioning a photograph involves open flash night work. In most cases, the picture that you see never existed at any point in time. In real life it was a dark subject and a dimly lighted background punctuated with moments of brilliance as the various flashbulbs were set off. Only the film could capture the total image of all the combined elements of available and artificial light. But to be able to execute the shot, the photographer setting off the flash must be able to pre-envision what each flashbulb will contribute to the scene and how the overall open time will capture the existing light. If he calculates properly, the picture is a success. If he guesses wrong, it’s the “cull box” for the slide.
Pre-envisioning. We all do it. Consciously thinking about it will make us better photographers.